Key Takeaways
- Troubleshoot to ensure the garage door opener is receiving consistent power and signals – check outlets, batteries, and antenna placement. This will clear up a lot of operational failures, fast.
- Always maintain the safety sensors, clean them regularly, align them, and check for physical obstructions or misalignments in the tracks for smooth, safe door movement.
- Check your garage door opener’s manual for error codes, flashing lights, and beeps – these diagnostics will guide you towards effective troubleshooting.
- Watch for mechanical wear — worn springs, rollers, or cables — if you can tackle component deterioration or odd noises early, you can avoid big, expensive repairs down the line.
- Think about temperature changes, humidity, and other environmental factors as these can affect door performance and need tweaking or preventative maintenance.
- Plan regular maintenance — such as lubrication and professional inspections — to prolong your garage door system’s life and reduce the risk of costly surprises.
Garage doors won’t open or close right typically indicate issues with the power, obstructed sensors, or deteriorated mechanical components. The majority of garage doors rely on a motorized opener, a safety sensor, and a complex system of tracks, springs, and cables. Garage doors are complex mechanical systems, and when one piece ceases to function, the entire system can break down. A malfunctioning remote, dead batteries, or a tripped circuit breaker can prevent the door from opening or closing.
Weather shifts or grit in the tracks cause the system to stick or jam. To identify the culprit, examine every component for wear or damage. The following few posts will include easy-to-follow fault-finding flow charts and advice for repairing some of the more common problems with garage door systems.
Diagnosing Your Garage Door Problem
Garage doors can quit on you for a lot of reasons, from basic power problems to antiquated hardware. Knowing the root causes assists you in identifying the issue, repairing it, or determining if the assistance of a professional is still required. Here’s a table of common problems, symptoms, and possible fixes for easy reference.
Problem | Symptom | Possible Solution |
Power failure | No response from opener | Check the outlet, breaker, and fuses |
Dead remote battery | Remote doesn’t work, wall button does | Change the remote batteries |
Signal interference | Opener works inconsistently | Remove nearby wireless devices |
Misaligned sensors | The door reverses or won’t close | Align or clean safety sensors |
Obstruction on the track | Door jams, moves unevenly | Remove debris, realign tracks |
Worn rollers or springs | The door is noisy, slow, or stuck | Inspect and replace worn parts |
Wrong limit setting | Door doesn’t open/close fully | Adjust opener settings |
Old opener | Opener >20 years, erratic behavior | Replace opener |
1. Power and Signal
If your garage door doesn’t respond at all, see if the opener is plugged in and the outlet is live. Occasionally, the breaker trips, or a fuse blows, shutting power off. If the wall button functions but the remote doesn’t, replace the batteries. A corroded, weak, or blocked antenna will cause signal issues. Ensure that it is hanging freely and not bent or broken.
2. Safety Sensors
There are two tiny sensors at the bottom of the door that have to be opposite each other. If the photo-eye is obscured by dirt, spider webs, or anything else, the door can decline to close or reverse mid-way. Clean and align both lenses. Try waving a hand in front of one sensor – the door should halt or reverse. If the door has five cracks or the sensor has loose wires, it will have to be replaced.
Misaligned or dirty sensors are most often the culprit behind a door that stops and won’t close all the way.
3. Opener Settings
Your opener has open and close distance and force controls. If your door won’t open or close all the way, check your manual for travel limit adjustment. Every once in a while, a factory reset can cure nutty behavior. If the door slams shut or won’t close, you may need to decrease the force setting. You need to adjust these settings carefully, otherwise you could cause harm or unsafe operation.
4. Physical Obstructions
Examine the tracks for little rocks, leaves, or any other objects that can jam the rollers. Even a little debris can obscure safety sensors and prevent the door from closing. Make certain nothing is obstructing the door’s path. Misaligned tracks can cause the door to stick or shift. Remove debris and test for alignment.
A jammed door can expose your garage to the elements and unwelcome critters.
5. Mechanical Failures
Examine springs, cables, and rollers for rust, fraying, or breakage. Rollers have a specific lifespan of cycles before they need to be replaced. Pay attention to any noisy grinding or squeaking noises — these can indicate issues with hinges or tracks. If the door appears crooked or sluggish, a worn component may be to blame.
A bit of preventative maintenance — such as lubricating springs, chains and tracks every few months — can stave off some of these problems.
Understanding Diagnostic Indicators
Garage door openers have various diagnostic indicators to assist you in identifying and resolving issues. These diagnostic indicators—such as flashing lights, beeping sounds, and error codes—provide hints about defects or malfunctions. Misadjusted limit settings, blocked sensors, low transmitter batteries, and power issues frequently reveal themselves via these indicators. Knowing how to read these signs, fast and correctly, can aid in a quick fix and minimal downtime.
Flashing Lights
A garage door opener can blink lights in codes to indicate particular errors. For instance, a blinking light could indicate a blocked photo-eye sensor, and a steady flash may signify that the safety reverse system is engaged. Every opener brand and model will have a different flash code list, so please check your user manual. If the lights continue flashing after addressing the cause of the problem, attempt to reset the opener – this purges lingering error states and enables you to confirm if the issue is resolved. Use these flash patterns as a guide: if you see a certain pattern, it tells you where to check, like the sensors or the power cord.
Audible Beeps
Short and long beeps from the opener can alert you to new or existing issues. Count the beeps. Two short beeps might indicate a transmitter battery is low, and a long beep could indicate a stuck door or misaligned limit. Determine the source of the beeping — it’s usually the main unit, but occasionally it might be a sensor or keypad. If the beeping continues after you repair what you suspect is the culprit, reset the unit. Record the beep pattern. It gets a service tech or support team to triage recurring issues quickly.
Error Codes
Most new openers have an error code on a little screen or indicator light. Always consult your manual–E2, for example, might stand for sensor fault on one brand and power loss on another. Record the code, should you require support or have to bring in a pro. Most openers require a reset step—typically pressing and HOLDING a particular button.
Post-reset, if the code returns, there is still an issue with the unit (sensor blocked, bad wiring, dirty photo-eyes).
Diagnostic Indicator Table
Indicator | Meaning | Recommended Action |
Flashing Light | Blocked sensor, misaligned door | Check the sensor, clear the path |
Audible Beeps | Low battery, jammed door | Replace battery, inspect door |
Error Code | Fault in the opener or sensor | Refer to the manual, reset the opener |
Uneven Motion | Obstruction, worn parts | Clean, check rollers/springs |
No Power | Unplugged, power cut | Plug in, check outlet |
Beyond the Obvious Fixes
Garage door issues are frequently more than meets the eye. Some are intermittent, others are related to factors such as weather or the age of the door and its components. Mechanical wear, tiny electrical glitches, and even temperature fluctuations can all accumulate, causing the door to stop functioning properly. The points below show several less common factors that may affect garage door performance:
- Misadjusted limit settings on the opener
- Door track misalignment
- Sensitivity settings are set too high or too low
- Stripped opener gear
- Keypad out of sync
- Disconnected or damaged wires
- Accumulated stress from daily use
- Broken torsion/extension springs or snapped cables
- Rust or corrosion on metal parts
- Seasonal changes affecting material expansion and contraction
Intermittent Faults
Sometimes garage doors only break on occasion. These stop-start glitches can be hard to notice unless you look for patterns over days or weeks. You may observe the door stall in mid-cycle or not move at all, and then resume later. Document what you observe and when it occurs—this can assist you or an expert to identify the underlying cause.
The usual suspects, like loose wires or bad connections, are typical culprits. A hair-thin, barely hanging on wire might be fine one day and not the next. Testing the garage door a few times, in a row, under the same conditions, helps demonstrate whether the problem is fluky or related to something else. Inspecting every connection and wiring for wear can detect issues before they escalate.
Environmental Factors
Temperature swings can cause metal components to expand or contract, leading to tracks shifting or rollers sticking. Humidity or moisture buildup can cause rust and corrosion on springs, cables, and rails. If you have large seasonal changes, your garage door could require more frequent checks and maintenance.
A stuffy or closed-in garage can trap humidity, accelerating rust and making parts stick. Good airflow keeps components dry, which is critical if you live somewhere that rains or snows a lot.
Component Wear
Springs, rollers, and hinges all wear down over time, quicker if the door is opened numerous times daily. Seek indicators such as squeaking, sticking, or visibly worn or misshapen components. While oiled moving parts can assist, sometimes they just need to be swapped out.
Scheduled inspections are the best way to catch wear before it becomes an expensive repair. If you spot a broken spring or cable, call a pro—these are not safe DIY fixes.
Rust and Corrosion
Rust appears as flakes or roughness on metal. Corrosion eats away and can make parts snap without notice. Both issues need quick action: clean off rust, treat with anti-rust spray, and replace any parts that are too far gone.
Simple Garage Door Adjustments
Simple garage door adjustments can fix most garage door problems and maintain your system in tip-top shape. When a door won’t open or close as it should, minor adjustments can return it to complete functionality and increase safety. Correct alignment and force ensure added protection to homes from intruders.
Realigning Sensors
Sensors must align perfectly for the door to operate correctly. A simple level helps check if both sensors face each other straight across the bottom of the door. If you sit up higher or lower, the door won’t close, or it will reverse randomly.
Manually activate each sensor so that the lights come on. A green or red light usually indicates that both sensors line up. If the light doesn’t stay on, continue adjusting their position until it does. Tighten them with a screwdriver to prevent the sensors from shifting out of alignment. Test the door and observe if it closes completely without halting or reversing.
Adjusting Limits
Limit adjustment screws may sit on the main opener unit, usually labeled as ‘up’ or ‘down’. These determine how far the door moves in each direction. If the door stops short or slams into the ground, adjust the screw in small increments— about a quarter turn at a time.
After every adjustment, cycle the door up and down. Verify that it opens completely and closes against the floor. As gaps over 7 mm can attract burglars or vermin. If the door still gaps or fails to reach the top, repeat and check both tracks. To adjust the gap, loosen the track bolts with a wrench, and shift the tracks until a 6-millimeter gap appears beneath the door. Gently tap the track with a rubber mallet if necessary, then tighten all screws.
Setting Force
Force settings dictate how much the opener pushes or pulls. If the door reverses with light contact or halts without cause, lower the force. If the door moves slowly or does not close, increase the force a little.
To test the adjustment, press up gently as the door closes. If it continues, the power is correct. If it stalls or reverses, turn it down. If the door catches, lift it slightly. Remember to test after each adjustment to ensure smooth and safe door operation.
When to Call for Repair
A garage door that refuses to open or close isn’t just annoying—it’s a potential security risk and a ticking time bomb for costlier damage. What starts as a minor hiccup can quickly spiral into a major repair if ignored. Temporary fixes won’t cut it for deeper mechanical issues. Spotting the warning signs early and calling in a professional can be the difference between a quick tune-up and a full-blown replacement, saving you stress, time, and money in the long run.
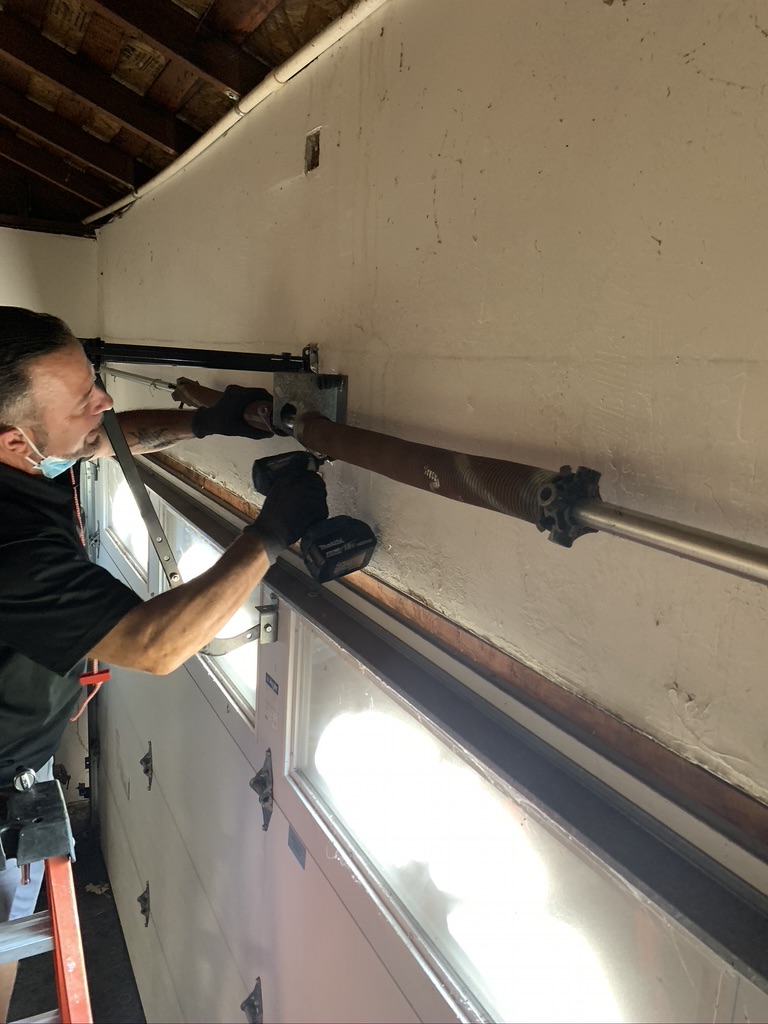
Broken Springs
Broken springs prevent a garage door from opening immediately. These springs support the weight of the door, and if they break, it may not move at all or fall without warning. Attempting to switch springs yourself is dangerous. The spring’s tension can lead to some serious injuries if you don’t handle it right.
Never take care of spring repairs yourself. Always leave it to a good technician. They have the proper tools and know how to get it done safely. Check your springs for rust or gaps every couple of months. If you hear a loud bang or see the door hanging unevenly, these are indicators that the spring could be broken. Springs tend to wear out after a few years, so inspections on a routine basis can identify wear before a breakdown.
Snapped Cables
Cables keep the door balanced and operating smoothly. If a cable snaps, the door may slam or get stuck. Frayed or rusted cables are caution signals. Peek down the sides of the with loose or broken wires.
If you notice any damage, don’t use the door. That’s when you call a technician, pronto! They can install new wiring and test for additional issues. It’s dangerous to use a door that has broken cables.
Damaged Panels
Panels absorb most bumps, weather, and wear. Dents, cracks, or warped locations make the door susceptible and can damage its appearance. If you notice damage, see if it’s just the surface or if the panel is warped.
A few dents are repairable; however, large cracks or splits could indicate that the entire panel requires a replacement. Torn panels allow wind or bugs to invade and damage curbside appeal. A garage door professional can tell you what’s better—repair or replace.
Opener Malfunctions
If your garage door opener suddenly goes silent—or makes odd grinding noises without moving the door—you’ve got more than just a dead battery on your hands. Unresponsive remotes, wall buttons that do nothing, or strange sounds could signal a stripped gear, faulty wiring, or a failing sensor. Start with the basics: check the remote’s batteries and look for visible damage to the opener box. Try a backup remote to rule out a simple fix.
But if it’s still not budging, don’t keep poking around. Calling a professional now can prevent a small issue from turning into a major (and costly) repair. Expert diagnostics and the right repairs keep your opener running safely, smoothly, and reliably—just the
The Importance of Maintenance
Garage doors are weighty systems we use regularly — closing and opening them more than 1,000 times per year! This up-and-down motion stresses all components—springs, cables, rollers, and the opener. Maintenance is not an option; it’s a clever move to steer clear of monster repair invoices and maintain system performance as designed.
Neglect allows minor issues to become major malfunctions that can prevent the door from opening or closing properly. Easy, routine maintenance will keep these doors lasting and operating longer, providing peace of mind for years to come.
Regular inspections assist in identifying early indications of damage prior to costly breakdowns. Springs, for instance, are only good for around 10,000 cycles, although that number depends on usage and your geographical location. Over time, old springs weaken and break, usually without warning. Catching this in an inspection lets you repair or replace the components ahead of a failure. Ditto the opener, as the door gets older, the opener strains, aging it more quickly, unless you monitor its components.
Lubricating your garage door might seem like a small task, but it makes a big difference. In under 10 minutes, a quick application of oil to the hinges, rollers, and tracks can silence annoying squeaks and help your door glide like new. Do it a few times a year, and you’ll prevent dry metal from grinding, warping, or even snapping — no matter if you’re dealing with desert heat, winter frost, or rainy seasons. While you’re at it, check those weather seals too. Cracked or worn seals don’t just let in dust and moisture; they invite damage to the door and anything you’re storing inside. A seasonal checkup could save you from costly repairs down the line.
To keep things clear, here are the top maintenance tasks for any garage door system:
- Check all moving parts, springs, and cables for wear or rust.
- Lubricate every hinge, roller, and track to reduce friction.
- Check the balance and alignment to maintain the door’s straightness.
- Check and replace weather seals as needed.
- Check the opener for strain or strange noises.
Conclusion
Examine the tracks for dirt or dings. Use a scanning sensor to check for dust blocking. Check to see if your door springs appear worn. Test the remote once you replace the battery. These quick steps save time and money. If the door still jams or makes a loud noise, call a skilled repairman. A pro can identify serious problems quickly. Stay on top of simple maintenance such as oiling moving parts and clearing the tracks. A door that works efficiently protects your home and pays for itself. For additional tips or assistance, contact or share your tale below.
Frequently Asked Questions
1. Why won’t my garage door open or close?
The garage door may not work due to power, sensors blocked, springs broken, or the track shifted. Before calling a professional, check these common causes.
2. What do blinking lights on my garage door opener mean?
Blinking lights are usually a sensor issue or interference. See if something is blocking the sensors and that they are both clean and aligned.
3. How can I manually open my garage door?
Pull the emergency release cord, typically a red handle. This releases the door from the opener so you can open or close it manually.
4. When should I call a professional for garage door repair?
Make a call to the pro if you see broken springs or cables, or the door remains stuck even after simple fixes. These problems are hazardous to repair by yourself.
5. How often should I maintain my garage door?
Inspect your garage door every six months. This type of routine care avoids major issues and increases the door’s longevity.
6. What are simple garage door adjustments I can do myself?
You can bump sensor alignment, secure tighten loose hardware, and lubricate moving parts. Follow the manufacturer’s instructions for safety always.
7. Why does my garage door reverse before closing completely?
This typically indicates the safety eyes sense an object or are out of alignment. Clean and realign the sensors to cure this problem.
Get Back to Normal—Fast—with Bay Area Doors
Don’t let a broken garage door slow you down. Whether it’s refusing to open, stuck halfway, or making unsettling noises, you need expert help—and you need it now. At Bay Area Doors, we deliver fast, reliable garage door repair backed by decades of experience and a real commitment to customer satisfaction. From emergency fixes to routine maintenance, our local team shows up on time, ready to get your door working smoothly again. Call Bay Area Doors today and let us help you get your life—and your garage—back on track.